Supported Gateways & Integration
Comprehensive guide to configuring and integrating BLE-enabled gateways with EazyTrax for seamless IoT data collection and tracking.
Gateway Overview
EazyTrax supports a wide range of enterprise-grade wireless gateways from leading manufacturers. These gateways act as data collection points for BLE devices, sensors, and beacons, providing real-time telemetry data for comprehensive IoT monitoring and analytics.
Enterprise Grade
Professional wireless infrastructure solutions designed for high-density environments and mission-critical applications.
Secure Integration
Advanced security protocols and encryption to ensure safe data transmission from IoT devices to EazyTrax platform.
Real-time Processing
Low-latency data processing and immediate telemetry updates for time-sensitive IoT applications and monitoring.
Supported Gateway Vendors
EazyTrax integrates seamlessly with major wireless infrastructure vendors, providing comprehensive support for various gateway models and configurations.
Aruba Networks
Full support for Aruba InstantOn and Aruba Central managed access points with BLE capabilities including AP-635, AP-655, and newer models.
Cisco Meraki
Integration with Meraki cloud-managed wireless access points, leveraging their built-in BLE scanning capabilities for location services.
TP-Link Omada
Support for TP-Link Omada series access points with BLE functionality, including EAP670 and newer models with Bluetooth scanning features.
Fortinet FortiGate
Compatible with FortiGate wireless controllers and FortiAP access points that support IoT and BLE device detection capabilities.
Huawei
Integration support for Huawei enterprise wireless solutions and access points with IoT sensing and BLE tracking capabilities.
Raspberry Pi
Purpose-built gateway solution using Raspberry Pi for optimal BLE data collection and processing with full control and customization.
Gateway Comparison Overview
| Vendor | BLE Support | Integration Method | Management |
|---|---|---|---|
| Aruba | Native | API + WebSocket | Central/InstantOn |
| Cisco Meraki | Native | Scanning API | Cloud Dashboard |
| TP-Link | Native | HTTP Stream | Omada Controller |
| FortiGate | Limited | SNMP/API | FortiManager |
| Custom/RPi | Full | Direct/MQTT | EazyTrax Platform |
Configuring Aruba Gateway for BLE Tracking
Aruba Networks provides enterprise-grade access points with built-in BLE capabilities. Configure your Aruba InstantOn or Central-managed APs to stream BLE data to EazyTrax for real-time asset tracking and location services.
Supported Aruba Models
500 Series
- � AP-505
- � AP-515
- � AP-535
600 Series
- � AP-635
- � AP-655
700 Series
- � AP-735
- � AP-755
Configuration Steps
Access Aruba Central or InstantOn
Log in to your Aruba Central dashboard or Aruba InstantOn interface using your credentials.
Enable BLE Radio
Navigate to Configuration ? Access Points ? Select your AP ? Radio Settings. Enable the BLE/IoT radio if not already enabled.
Configure WebSocket Stream
Set up the BLE data stream to forward to EazyTrax server:
- Server URL: https://your-eazytrax-server.com/api/collector/aruba
- Protocol: WebSocket (WSS)
- Authentication: API Token
Set Scanning Parameters
Configure BLE scanning interval and reporting frequency. Recommended settings: Scan Interval: 1000ms, Report Interval: 5000ms
Apply and Verify
Save the configuration and verify that BLE data is being received by checking the EazyTrax dashboard or collector logs.
tips_and_updates Best Practices
- Position APs strategically for optimal BLE coverage
- Use firmware version 8.10 or later for best BLE performance
- Monitor AP health and BLE radio status regularly
- Implement network segmentation for IoT traffic
Configuring Cisco Meraki Gateway for BLE Tracking
Cisco Meraki access points feature built-in BLE scanning capabilities that can be configured through the cloud-based Meraki Dashboard. Integrate with EazyTrax for comprehensive asset tracking and location analytics.
Supported Cisco Meraki Models
WiFi 6 Series
- � MR36
- � MR46
- � MR56
WiFi 6E Series
- � MR46E
- � MR86
WiFi 7 Series
- � MR57 (upcoming)
- � MR87 (upcoming)
Configuration Steps
Access Meraki Dashboard
Log in to your Meraki Dashboard at dashboard.meraki.com with your organization credentials.
Enable Scanning API
Navigate to Network-wide ? Configure ? General. Enable the "Scanning API" feature and note the validator string.
Configure POST URL
Set up the receiver URL where Meraki will send BLE scanning data:
Set Scanning Parameters
Configure minimum RSSI threshold and scanning interval. Recommended: RSSI -80dBm, Interval: 5 seconds
Validate Configuration
Use the validator endpoint to verify that EazyTrax can receive data from Meraki. Check the dashboard for incoming BLE observations.
API Integration Details
Scanning API Format
Meraki sends BLE observations in JSON format via POST requests:
Data Fields
- clientMac: BLE device MAC address
- rssi: Signal strength indicator
- seenTime: Timestamp of observation
- lat/lng: GPS coordinates (if available)
tips_and_updates Best Practices
- Ensure stable internet connectivity for cloud dashboard access
- Use HTTPS with valid SSL certificate for receiver endpoint
- Monitor API call limits and rate throttling
- Implement proper error handling for validator responses
Configuring TP-Link Gateway for BLE Tracking Software
The TP-Link Omada gateway allows for the configuration and management of BLE (Bluetooth Low Energy) streams, which are essential for tracking and IoT data collection. The following instructions guide you through setting up your TP-Link gateway to work with your BLE tracking software.

Accessing the Bluetooth Configuration Menu
Login to Omada Controller:
Open your web browser and navigate to the Omada controller's IP address. Enter your credentials to log in.
Navigate to the Bluetooth Configuration:
In the left-hand sidebar, find and click on the Wireless Networks section. Within the Wireless Networks menu, select Bluetooth.
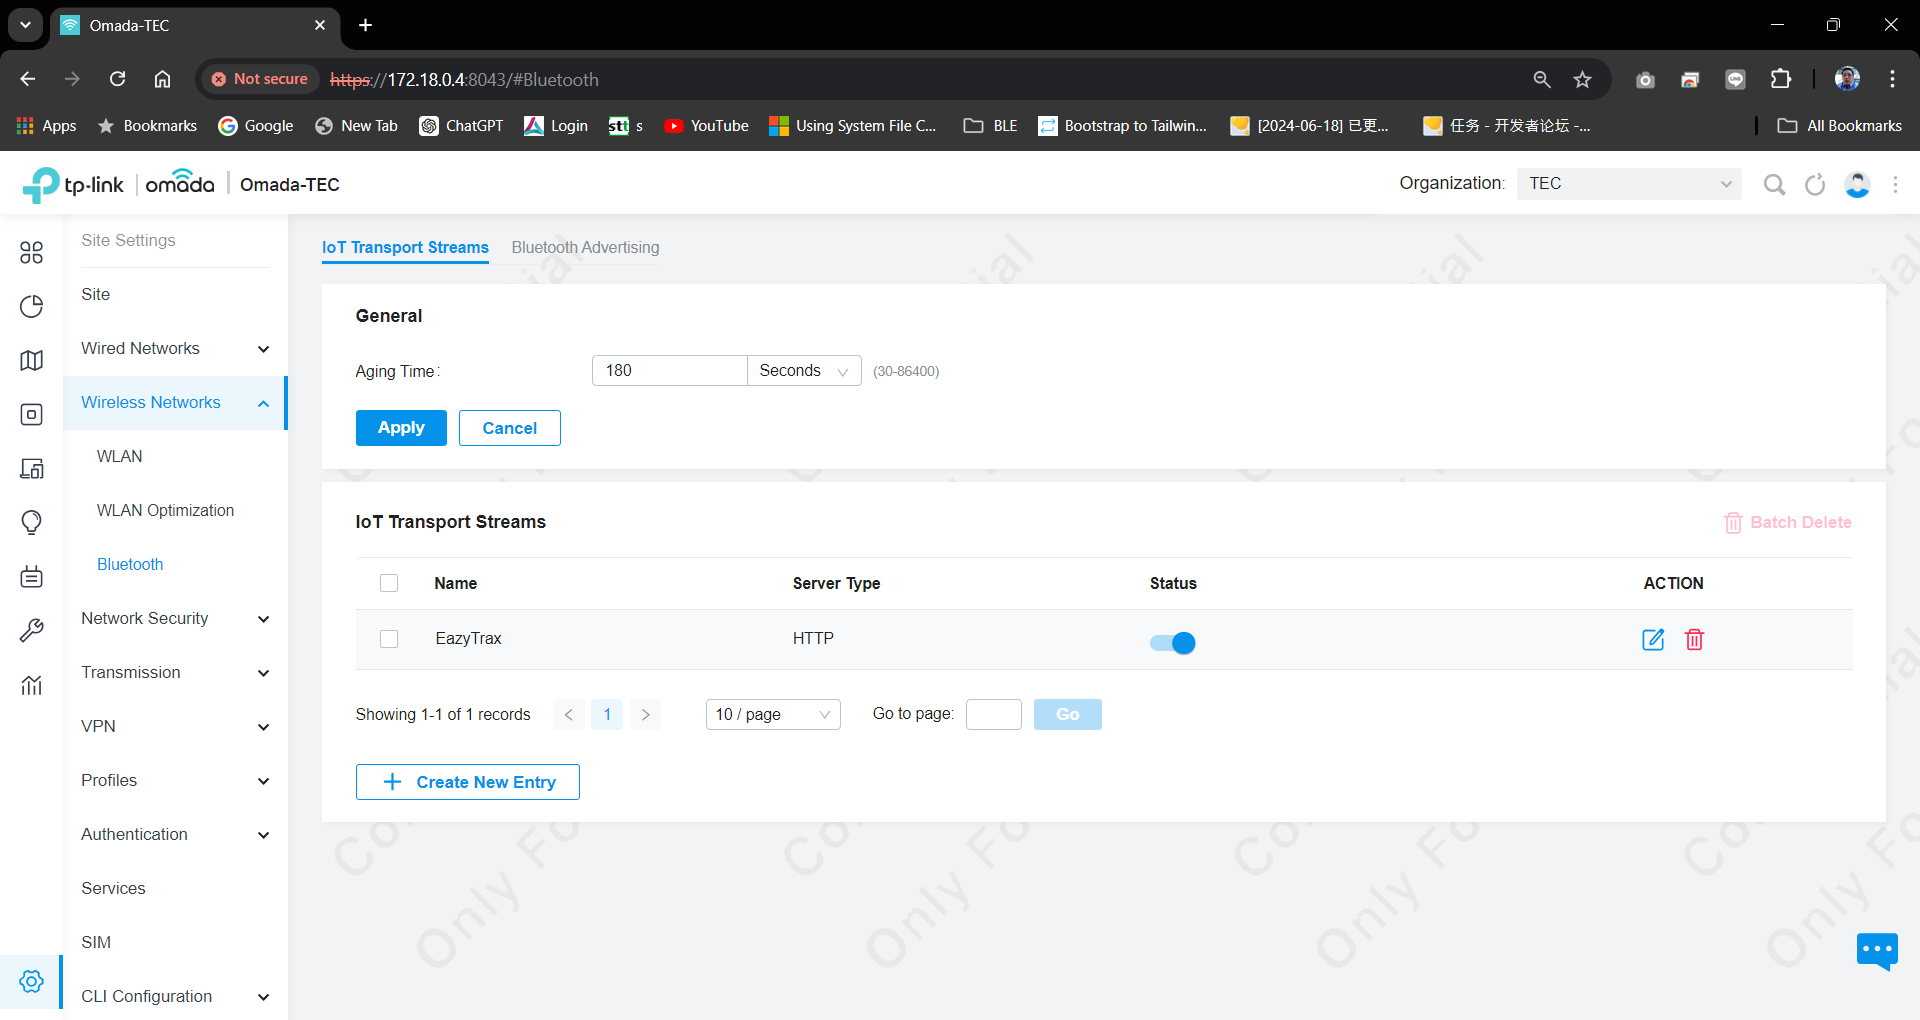
Setting Up IoT Transport Streams
Creating a New IoT Transport Stream:
Click on the Create New Entry button to add a new transport stream for your BLE tracking software. Fill in the details such as the stream name, server type, and other relevant configurations.
Configuring Stream Details:
- Name: Enter a recognizable name for your stream, like "EazyTrax."
- Server Type: Select the type of server (e.g., HTTP) that will receive the BLE data.
- Status: Ensure that the stream status is toggled on (indicated by the blue switch) to start transmitting data.
Setting Aging Time:
The Aging Time setting determines how long BLE data is retained before it is purged. This can be set based on your tracking requirements. The default is 180 seconds, but you can adjust this according to your needs.
Apply Configuration:
After entering the necessary details, click Apply to save and activate the configuration.
Managing IoT Transport Streams:
You can edit or delete existing streams using the icons in the ACTION column next to each stream. To edit, click the pencil icon; to delete, click the trash icon.
IoT Transport Stream Configuration for TP-Link Gateway
The IoT Transport Stream settings allow you to configure how BLE (Bluetooth Low Energy) data is transmitted from your TP-Link Omada gateway to your server. This section provides detailed guidance on setting up and customizing the IoT Transport Stream settings to ensure proper data transmission for your BLE tracking software.
Accessing the IoT Transport Stream Settings
Navigate to the IoT Transport Stream settings by going to the Wireless Networks section in the Omada controller interface. Then, select Bluetooth from the submenu. Under the IoT Transport Streams tab, click on an existing stream (e.g., "EazyTrax") or create a new entry.
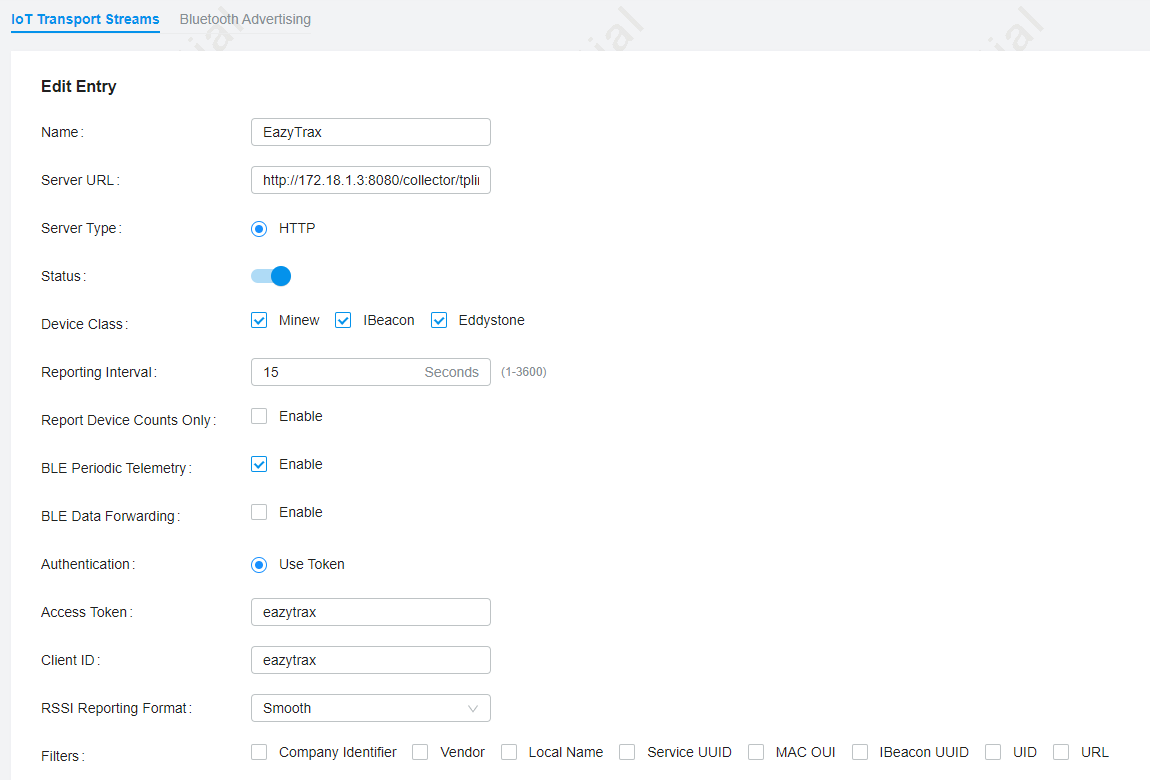
Editing an IoT Transport Stream
Stream Name:
Enter a meaningful name for the stream, such as "EazyTrax", to easily identify it in the list of IoT streams.
Server URL:
Input the URL of the server where the BLE data will be sent. This URL should be configured to handle incoming BLE data.
http://172.18.1.3:8013
Server Type:
Choose the server type for the data transmission. In most cases, HTTP is used for sending data to a web server.
Status:
Toggle the Status switch to enable or disable the data stream. Make sure it is set to on (indicated by a blue switch) for the stream to be active.
Device Class:
Select the types of BLE devices that this stream will handle. You can choose from options like Minew, iBeacon, and Eddystone depending on the types of beacons in use.
You can select multiple device classes if your setup includes different types of beacons.
Reporting Interval:
Set the reporting interval to determine how often the gateway should send BLE data to the server. The interval can be set between 1 to 3600 seconds.
15 seconds means the data will be reported every 15 seconds
Report Device Counts Only:
Enable this option if you only want to report the number of devices detected, rather than detailed telemetry data.
Additional Configuration Options
BLE Periodic Telemetry:
Enable this setting to allow the gateway to send periodic telemetry data from the BLE devices.
BLE Data Forwarding:
If your setup requires forwarding BLE data to another destination, enable this option.
RSSI Reporting Format:
Choose the format in which RSSI (Received Signal Strength Indicator) data should be reported.
Smooth - averages out RSSI values to provide more stable readings
Authentication
Use Token:
Select this option to use an access token for authenticating the data stream.
Access Token:
eazytrax
Client ID:
eazytrax
Filters
Apply filters to control which specific BLE data elements are included in the reports:
Selecting filters will limit the reported data to the selected fields.
Saving the Configuration
After configuring all the settings, ensure that you save your changes.
Configuration Interface
Bluetooth Advertising Profile Configuration for TP-Link Gateway
This guide walks you through the configuration of each item within a Bluetooth Advertising profile in the TP-Link Omada gateway. Proper configuration ensures your BLE beacons are broadcasting effectively and are easily identifiable by your BLE tracking software.

Creating and Configuring a New Bluetooth Advertising Profile
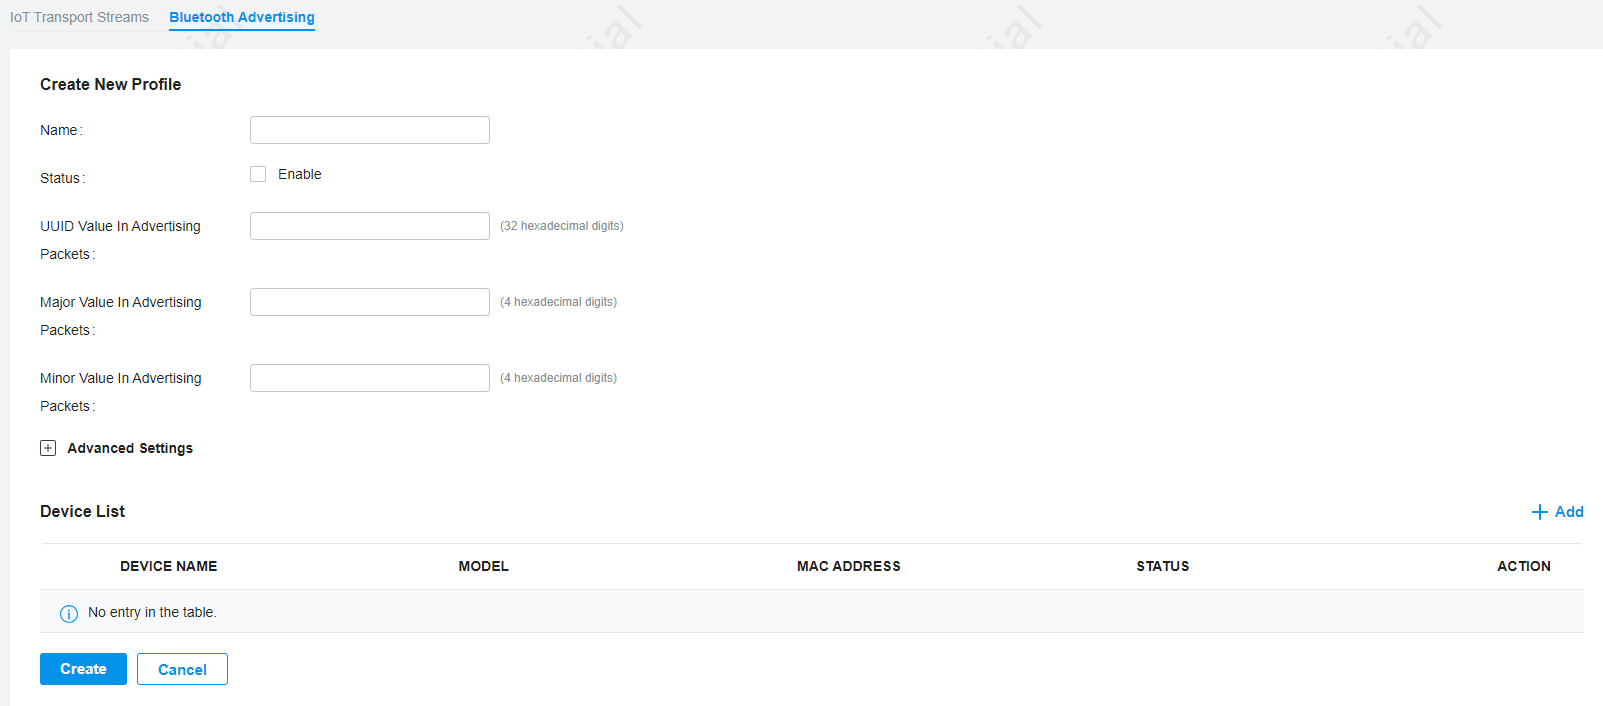
Navigate to Bluetooth Advertising:
Go to the Wireless Networks section in the Omada controller interface, select Bluetooth, and click on the Bluetooth Advertising tab. To create a new profile, click on the Create New Profile button.
Profile Name:
Enter a descriptive name for the advertising profile.
WarehouseBeacon1
Status:
Check the Enable box to activate this advertising profile.
UUID Value in Advertising Packets:
Enter the UUID (Universally Unique Identifier) that will be broadcasted by this beacon.
123e4567-e89b-12d3-a456-426614174000
Major Value in Advertising Packets:
The Major Value is a 4-digit hexadecimal number used to group beacons within the same UUID.
0001
Minor Value in Advertising Packets:
The Minor Value is another 4-digit hexadecimal number that further distinguishes individual beacons within the same major group.
0002
Advanced Settings (Optional)
Transmit Power:
Set the Transmit Power for the beacon.
0 dBm
RSSI Calibration:
Enter the RSSI Calibration value, which is the expected RSSI at 1 meter from the beacon.
-65 dBm
Advertising Interval:
Set the Advertising Interval to determine how often the beacon broadcasts its signal.
500 ms
Device List
Add Devices:
In the Device List section, add specific devices that will be associated with this advertising profile. Include details like Device Name, Model, MAC Address, and Status.
Managing Devices:
Use the Add button to include more devices, and manage existing devices using the actions provided in the table.
Finalizing the Configuration
Create Profile:
After configuring all the settings, save and activate the new Bluetooth advertising profile.
How to Configure NTP in TP-Link Omada Controller
Network Time Protocol (NTP) configuration ensures accurate timestamping for your BLE tracking data
Log in to the Omada Controller:
- Access the Omada Controller web interface using your browser.
- Log in with your admin credentials.
Navigate to System Settings:
- Once logged in, go to the "Settings" tab on the left-hand side menu.
- Under the "Settings" menu, select "System".
Set NTP Server:
- In the "System" settings, scroll down to the "Time Settings" section.
- You should see an option to configure the NTP Server.
- Enter the NTP server address you wish to use:
time.google.com
pool.ntp.org
Save the Configuration:
After entering the NTP server information, click "Save" to apply the changes.
Verify the Configuration:
After saving, check if the time is synchronized correctly with the NTP server by viewing the current system time in the same section.
Configuring Huawei Gateway for BLE Tracking
Huawei enterprise wireless solutions provide robust BLE IoT sensing capabilities. Configure your Huawei APs to stream BLE data to EazyTrax for comprehensive asset tracking and location services in enterprise environments.
Supported Huawei Models
WiFi 6 Series
- � AirEngine 5760
- � AirEngine 6760
- � AirEngine 5761
WiFi 7 Series
- � AirEngine 8760-X1
- � AirEngine 8771-X1T
IoT Gateway
- � AR501 Series
- � AR511 Series
Configuration Steps
Access Huawei iMaster NCE
Log in to Huawei iMaster NCE (Network Cloud Engine) or eSight network management system with administrator credentials.
Enable BLE Service
Navigate to WLAN ? Service ? BLE Configuration. Enable BLE service and configure the BLE radio parameters for your APs.
Configure Data Stream
Set up the IoT data stream to forward BLE observations to EazyTrax:
- Server Address: your-eazytrax-server.com
- Port: 443 (HTTPS)
- Endpoint: /api/collector/huawei
- Protocol: HTTP/HTTPS POST
Set Scanning Parameters
Configure BLE scanning settings: Scan Duration: Continuous, Report Interval: 5s, RSSI Threshold: -75dBm
Apply and Monitor
Save configuration and monitor the data flow in iMaster NCE logs. Verify BLE data reception in EazyTrax dashboard.
Advanced Settings
IoT Profile Configuration
Create custom IoT profiles for different deployment scenarios:
- � Healthcare: High-frequency scanning for critical assets
- � Retail: Optimized for customer flow analytics
- � Manufacturing: Industrial-grade reliability settings
Security Configuration
- Enable TLS encryption for data transmission
- Configure API authentication tokens
- Set up network segmentation for IoT traffic
tips_and_updates Best Practices
- Use dedicated management VLAN for IoT data streams
- Enable QoS policies for BLE traffic prioritization
- Regular firmware updates for latest BLE features
- Monitor AP health and BLE radio performance via NCE
Raspberry Pi Gateway Installation Guide
Set up your Raspberry Pi as a dedicated BLE gateway for EazyTrax. This guide covers the complete installation process from downloading to configuration and verification.
Supported Raspberry Pi Models
Radxa ZERO 3W
Compact and powerful single-board computer with built-in WiFi and Bluetooth 5.0 support, ideal for IoT gateway applications.
Raspberry Pi Zero 2W
Ultra-compact Raspberry Pi with wireless connectivity and sufficient processing power for BLE gateway operations.
Installation Steps
Download Installation Package
Download the EazyTrax PiScanner package using wget command:
wget https://eazytrax.com/files/piscanner_1.0.0.deb
Install Package
Install the downloaded package using dpkg:
sudo dpkg -i piscanner_1.0.0.deb
Configure EazyTrax Server Connection
After installation, the setup wizard will prompt you for configuration:
info Required Configuration
EazyTrax Server IP Address
Enter the IP address or domain of your EazyTrax server
Example: 192.168.1.100 or eazytrax.yourcompany.com
API Port (Optional)
Press Enter to use default port 80, or specify custom port
Default: 80
skip_next Optional Configuration (Can Skip)
MQTT Username
Press Enter to skip (not required for EazyTrax operation)
MQTT Password
Press Enter to skip (not required for EazyTrax operation)
Verify Installation & Status
Check the service status to ensure it's running correctly:
sudo systemctl status piscanner
check_circle Expected Output (Success)
- ✓ Status: active (running)
- ✓ No error messages in the log
- ✓ Service started successfully
Access Gateway Web Interface
You can monitor real-time gateway data by accessing the web interface:
Open your web browser and navigate to:
http://[GATEWAY-IP-ADDRESS]
Replace [GATEWAY-IP-ADDRESS] with your Raspberry Pi's IP address
Troubleshooting
Service not running
Try restarting the service:
sudo systemctl restart piscanner
Connection errors
Verify network connectivity and ensure the EazyTrax server is reachable from the Raspberry Pi.
View logs
Check service logs for detailed error information:
sudo journalctl -u piscanner -f
tips_and_updates Best Practices
- Use a reliable power supply to prevent unexpected shutdowns
- Keep the Raspberry Pi OS updated for security and performance
- Position gateways strategically for optimal BLE coverage
- Monitor gateway status regularly through EazyTrax dashboard
- Configure automatic updates for the PiScanner package
Gateway 3D Model Viewer
Interactive 3D visualization of supported gateway hardware models
3D Gateway Model
Interactive viewer loading...
Viewer Controls
- Left Click + Drag: Rotate model
- Scroll: Zoom in/out
- Right Click + Drag: Pan view
- Double Click: Reset view
Model Information
- Model: Raspberry Pi Gateway
- Format: STL 3D Model
- Compatibility: Pi Zero 2W, Radxa ZERO 3W
- Viewer: Three.js WebGL